---
title: "Installation - DreamFactory"
source: "https://wiki.dreamfactory.com/index.php?oldid=33346&title=DFE%2FInstallation"
canonical_url: "https://wiki.dreamfactory.com/index.php?oldid=33346&title=DFE%2FInstallation"
converted_at: "2025-12-17T22:48:20.228Z"
format: "markdown"
converted_by: "html-to-md-ai"
---
[]()
# Installation
From DreamFactory
Jump to: [navigation](#mw-head), [search](#p-search)
[DFE](/DFE)Installation## Contents
- [1 Deployment Planning](#Deployment_Planning)
- [1.1 Minimum Requirements](#Minimum_Requirements)
- [1.2 Servers](#Servers)
- [1.3 DNS](#DNS)
- [1.3.1 Automated Additions](#Automated_Additions)
- [2 Installation](#Installation)
- [3 Installation for RHEL/Centos 7.x](#Installation_for_RHEL.2FCentos_7.x)
- [3.1 Update Yum](#Update_Yum)
- [3.2 Install PHP7, Git, Puppet, composer, vim](#Install_PHP7.2C_Git.2C_Puppet.2C_composer.2C_vim)
- [3.3 Disable Require TTY](#Disable_Require_TTY)
- [3.4 Disable SELINUX](#Disable_SELINUX)
- [4 Installation for Ubuntu 14.04/16.04](#Installation_for_Ubuntu_14.04.2F16.04)
- [4.1 Install PHP, Puppet, Git](#Install_PHP.2C_Puppet.2C_Git)
- [4.2 Installer Kickoff](#Installer_Kickoff)
- [4.3 Complete Walk-Through](#Complete_Walk-Through)
- [5 Post-Installation Steps](#Post-Installation_Steps)
## Deployment Planning
There are a few things to consider before installing DreamFactory Gold (DFG). The rest of this section will explain these considerations.
It goes without saying that if you are simply evaluating DFG, on a single instance, server and DNS planning are unnecessary. Skip ahead to the [Installer Utility](#Installer_Utility) section.
DreamFactory Gold may now be installed on both Debian (Ubuntu 14.04/16.04) and RHEL/Centos (7.x). This installer has also been tested on Oracle Linux 7.2. The installer will automatically select the appropriate packages based on your distribution.
### Minimum Requirements
The installer utility installs DreamFactory Gold as an all-in-one package. A 64 bit Ubuntu or RHEL/Centos machine is required with a minimum of 8GB of RAM. For production environments, we recommend at least 16GB of RAM and at least 4 cores.
### Servers
DFG is a distributed system. Each component can operate and scale independently of each other. Conversely, the entire system can be contained on a single server. Therefore, the best server layout fully depends on your usage and needs. If you're just testing out DFG and not ready to deploy a production system, installing everything on a single server is the way to go (as it's mostly automated).
The servers required are:
- Application: Responsible for hosting/running the DFG [Console](/DFE/Console), [Dashboard](/DFE/Dashboard), and/or the [Reporting](/index.php?title=DFE/Reporting&action=edit&redlink=1) system.
- Database: Responsible for the databases of hosted instances
- Web: Responsible for (web) hosting the deployed instances
### DNS
DFG operates each instance via [virtual hosting](https://en.wikipedia.org/wiki/Virtual_hosting) on one or more web servers. As such, you must determine the fully qualified domain name of your DFG installation before installing. **The system cannot be used fully until the DNS is in place**. Generally, clients will create a new subdomain within their DNS domain. This is the recommended practice. Using a new domain will eliminate any issues with DNS cross-contamination if troubleshooting an issue.
There are three records that need to be created for the DFG installation. These are:
- console.sub.domain.com (A/CNAME)
- dashboard.sub.domain.com (A/CNAME)
- *.sub.domain.com (A/CNAME)
The first two are straightforward. These point to the DFG [Console](/DFE/Console) and [Dashboard](/DFE/Dashboard). These can be either `A` or `CNAME` records. The final record is the [wildcard](https://en.wikipedia.org/wiki/Wildcard_DNS_record) entry. This allows all instances deployed on a server to share a single, common document root. For more information on how to set up your DNS with a wildcard record, please consult your DNS provider's documentation. Each provider has a different method for creating these records.
Please note that you **cannot** add a wildcard DNS entry to your local `/etc/hosts` file. It does not work.
#### Automated Additions
One of the features of the installation system is that several entries will be added to the installation system's `/etc/hosts` file. Here is an /etc/hosts file after the installer has completed:
127.0.0.1 localhost ip-10-10-2-40 console console.local dashboard dashboard.local console.zone.domain.com dashboard.zone.domain.com zone.domain.com
1 ip6-localhost ip6-loopback
fe00::0 ip6-localnet
ff00::0 ip6-mcastprefix
ff02::1 ip6-allnodes
ff02::2 ip6-allrouters
ff02::3 ip6-allhosts
You'll notice after the `localhost` entry, there are seven additional entries which reference the new DFG installation. `zone` and `domain` are gathered via the installation utility and are used here for exemplary purposes.
## Installation
To help with installation, a utility may be downloaded and run. This utility gathers the necessary information that then feeds into the main installation system, which is written using [Puppet](https://en.wikipedia.org/wiki/Puppet_(software)). [PHP](https://php.net) is required to run this utility. To use this utility you must first install the required packages, which differs depending on your operating system.
Before installation, we recommend having as minimal distribution as possible. The installer will set up a full stack environment on your server and having a clean, minimal distribution will reduce the chance of any potential conflicts with existing packages during the install.
## Installation for RHEL/Centos 7.x
### Update Yum
$ sudo yum update -y
### Install PHP7, Git, Puppet, composer, vim
**Add Webtatic Repos RHEL/Centos versions 7.x**
$ sudo rpm -Uvh [https://dl.fedoraproject.org/pub/epel/epel-release-latest-7.noarch.rpm](https://dl.fedoraproject.org/pub/epel/epel-release-latest-7.noarch.rpm)
$ sudo rpm -Uvh [https://mirror.webtatic.com/yum/el7/webtatic-release.rpm](https://mirror.webtatic.com/yum/el7/webtatic-release.rpm)
Now install minimal packages:
$ sudo yum install php70w php70w-fpm git puppet composer -y
### Disable Require TTY
Open the sudoers file and change the line:
$ sudo visudo
Default requiretty
Put a "!" in front of requiretty so it reads
Default !requiretty
Save the file and quit.
### Disable SELINUX
We recommend disabling selinux permanently. This will require a reboot of the server.
$ sudo vim /etc/selinux/config
Change to selinux=disabled. Save, quit and then reboot the server.
$ sudo reboot now
After the reboot, ensure that selinux is disabled:
$ sudo getenforce
Disabled
## Installation for Ubuntu 14.04/16.04
**Add PPA Apt Repository for PHP7**
Do this for both Ubuntu 14 and 16 as well, as the installer is based on these packages.
$ sudo add-apt-repository ppa:ondrej/php
$ sudo apt-get update
### Install PHP, Puppet, Git
$ sudo apt-get install php7.0 puppet git -y
### Installer Kickoff
Here's how to install the utility at a high level. The following instructions apply to both Ubuntu and RHEL/Centos distributions:
1. Update the system packages and install pre-requisites (see above)
2. Clone the utility's GitHub repository
3. Start the installation utility
4. Open your browser and enter the configuration settings
user@server:~$ git clone [https://github.com/dreamfactorysoftware/dfe-installer.git](https://github.com/dreamfactorysoftware/dfe-installer.git)
user@server:~$ cd dfe-installer
user@server:~/dfe-installer$ php -S 0.0.0.0:8000 -t public/
^C
At this point, fire up your browser and enter the public IP address of the installation system as follows:
```
http://ip.of.install.machine:8000
```
Port `8000` is used in the above example. You may use any port you prefer. However, you must ensure that whichever port you choose (including 8000!) is open to your browser from wherever the server is hosted. This is a temporary usage, so there will be no need for permanent port changes.
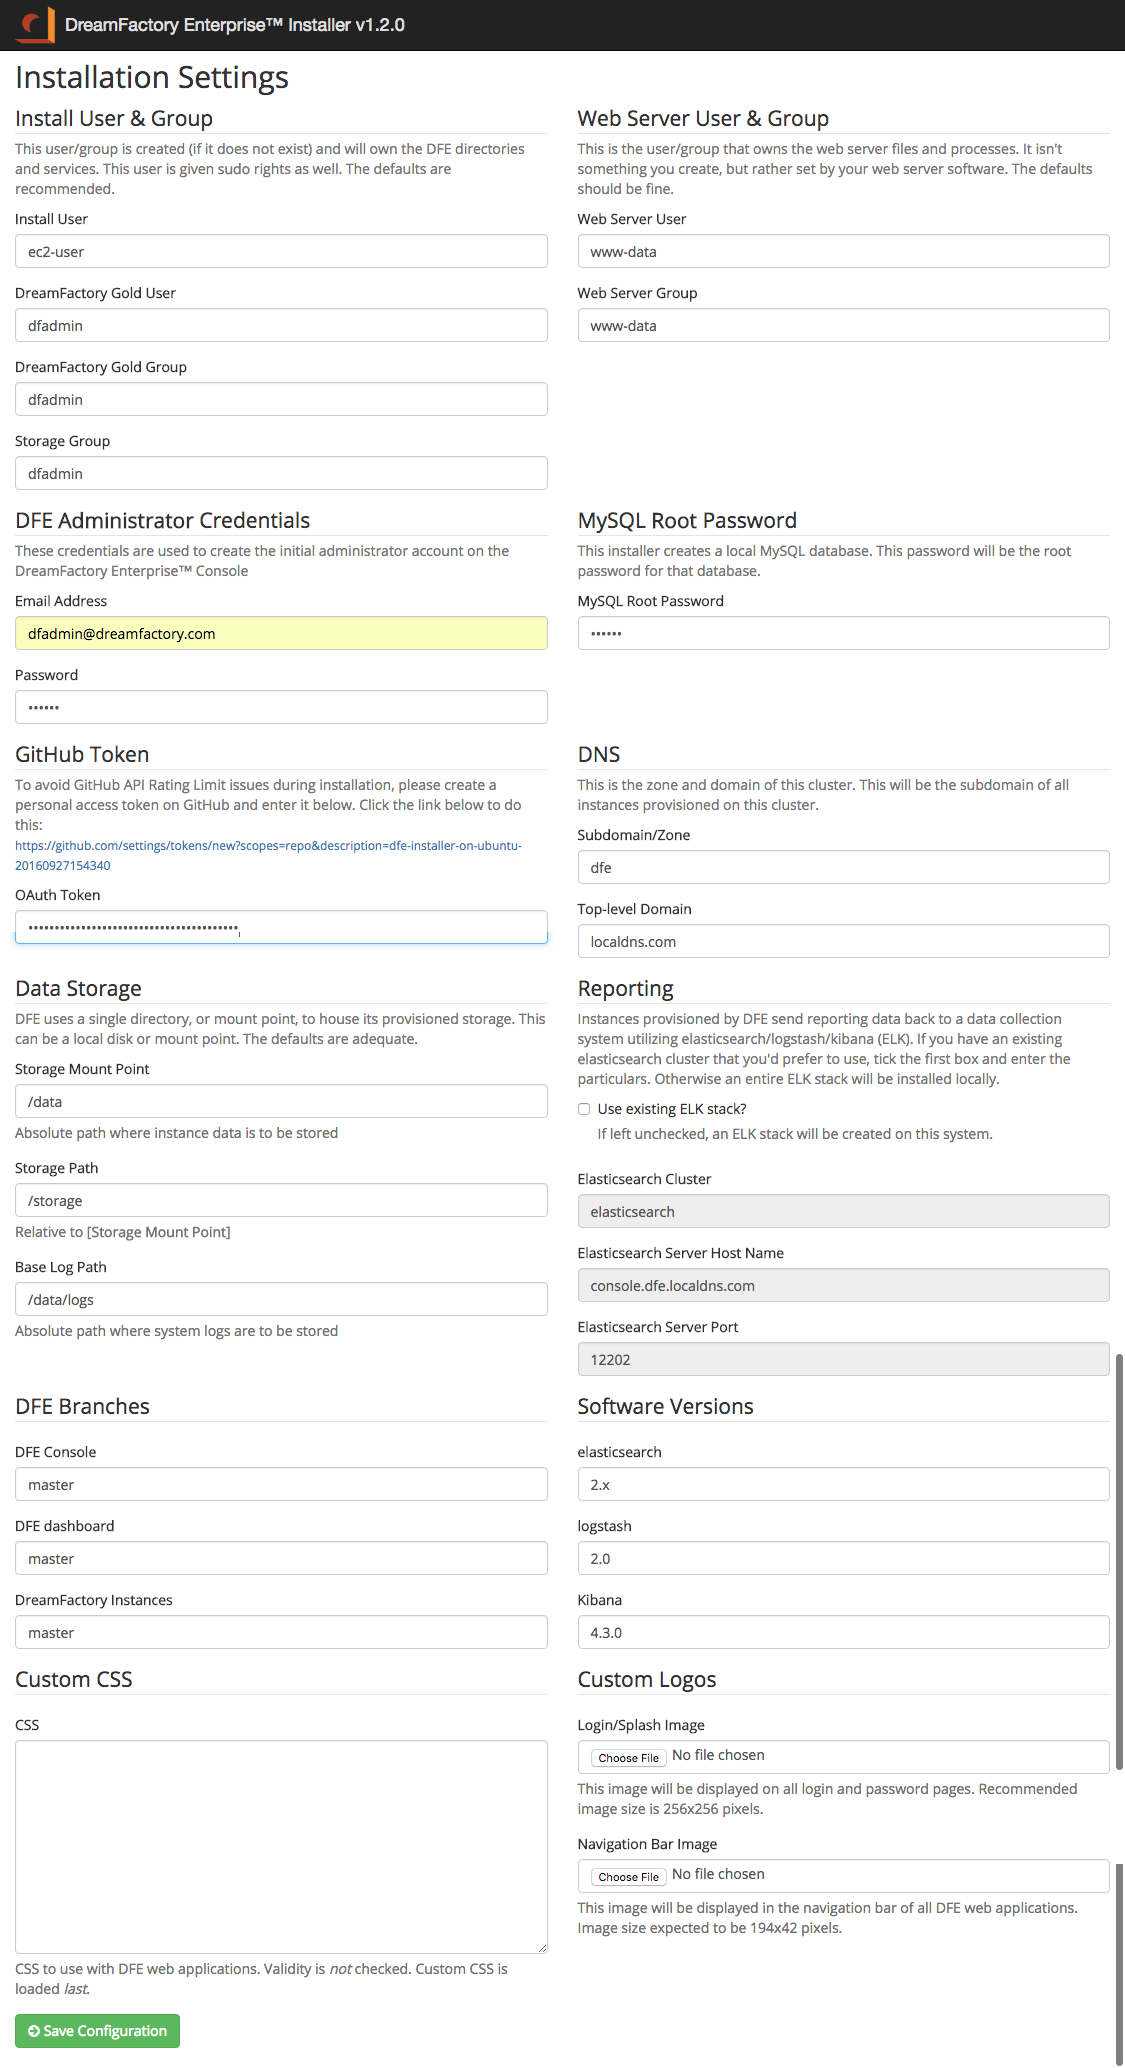
Here's what you should see in your browser:
[](/File:DreamFactory_EnterpriseInstaller.png)
This utility has all the installation options available. Once completed, the entries are written to a file called `.env-install` in the `storage` directory the installation root. This file is then read by the `./install.sh` script. This script does all the heavy lifting and completes the installation.
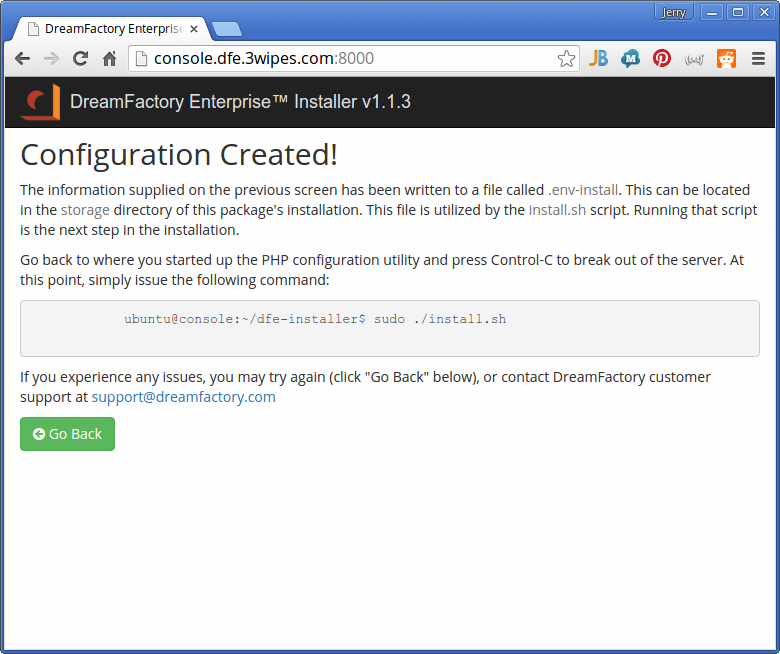
Once you've run the utility and created the installation environment file, you're ready to run the installation script.
To do this, from the root of the installation directory, run the following:
ubuntu@server:~/dfe-installer$ sudo ./install.sh
It may take up to 10 to 30 minutes to fully complete. This depends on your network connection and the server's specifications.
[](/File:Continue-view.png)
### Complete Walk-Through
This is a complete walk through of the installation process with all information returned.
```
ubuntu@ip-10-10-2-233:~$ sudo apt-get -q=2 update
ubuntu@ip-10-10-2-233:~$ sudo apt-get -q=2 -y upgrade
... # omitted/can vary
ubuntu@ip-10-10-2-233:~$ sudo apt-get -q -y install php5 git puppet
... # omitted/can vary
ubuntu@ip-10-10-2-233:~$ git clone https://github.com/dreamfactorysoftware/dfe-installer.git
Cloning into 'dfe-installer'...
remote: Counting objects: 8666, done.
remote: Compressing objects: 100% (84/84), done.
remote: Total 8666 (delta 20), reused 2 (delta 2), pack-reused 8578
Receiving objects: 100% (8666/8666), 9.65 MiB | 0 bytes/s, done.
Resolving deltas: 100% (2434/2434), done.
Checking connectivity... done.
ubuntu@ip-10-10-2-233:~$ cd dfe-installer/
ubuntu@ip-10-10-2-233:~/dfe-installer$ php -S 0.0.0.0:8000 -t public/
PHP 5.5.9-1ubuntu4.13 Development Server started at Wed Oct 7 23:51:19 2015
Listening on http://0.0.0.0:8000
Document root is /home/ubuntu/dfe-installer/public
Press Ctrl-C to quit.
[Wed Oct 7 23:51:57 2015] 76.97.26.128:45270 [200]: /
[Wed Oct 7 23:51:57 2015] 76.97.26.128:45271 [200]: /static/bootstrap-3.3.5/css/bootstrap.min.css
[Wed Oct 7 23:51:57 2015] 76.97.26.128:45273 [200]: /static/font-awesome-4.3.0/css/font-awesome.min.css
[Wed Oct 7 23:51:57 2015] 76.97.26.128:45272 [200]: /css/style.css
[Wed Oct 7 23:51:59 2015] 76.97.26.128:45254 [200]: /static/bootstrap-3.3.5/js/bootstrap.min.js
[Wed Oct 7 23:51:59 2015] 76.97.26.128:45255 [200]: /static/jquery-2.1.4/jquery.min.js
[Wed Oct 7 23:51:59 2015] 76.97.26.128:45276 [200]: /static/font-awesome-4.3.0/fonts/fontawesome-webfont.woff2?v=4.3.0
[Wed Oct 7 23:51:59 2015] 76.97.26.128:45256 [200]: /img/apple-touch-icon.png
[Wed Oct 7 23:51:59 2015] 76.97.26.128:45278 [404]: /public/img/apple-touch-icon.png - No such file or directory
[Wed Oct 7 23:52:34 2015] 76.97.26.128:45295 [302]: /
[Wed Oct 7 23:52:34 2015] 76.97.26.128:45297 [200]: /
[Wed Oct 7 23:52:34 2015] 76.97.26.128:45298 [200]: /static/font-awesome-4.3.0/css/font-awesome.min.css
[Wed Oct 7 23:52:34 2015] 76.97.26.128:45303 [200]: /static/bootstrap-3.3.5/css/bootstrap.min.css
[Wed Oct 7 23:52:34 2015] 76.97.26.128:45302 [200]: /css/style.css
[Wed Oct 7 23:52:34 2015] 76.97.26.128:45299 [200]: /static/jquery-2.1.4/jquery.min.js
[Wed Oct 7 23:52:34 2015] 76.97.26.128:45301 [200]: /img/apple-touch-icon.png
[Wed Oct 7 23:52:34 2015] 76.97.26.128:45300 [200]: /static/bootstrap-3.3.5/js/bootstrap.min.js
[Wed Oct 7 23:52:35 2015] 76.97.26.128:45304 [200]: /static/font-awesome-4.3.0/fonts/fontawesome-webfont.woff2?v=4.3.0
^C
ubuntu@ip-10-10-2-233:~/dfe-installer$ sudo ./install.sh
********************************************************************************
* DreamFactory Enterprise(tm) Linux Installer v1.1.2
********************************************************************************
install.sh: Checking system requirements...
install.sh: > Installed 6 required modules
install.sh: Installing now...
install.sh: Applying ./resources/assets/manifests/00-user.pp...
install.sh: Applying ./resources/assets/manifests/10-filesystem.pp...
install.sh: Applying ./resources/assets/manifests/20-percona.pp...
install.sh: Applying ./resources/assets/manifests/30-packages.pp...
install.sh: Applying ./resources/assets/manifests/40-dfe-console.pp...
install.sh: Applying ./resources/assets/manifests/50-dfe-dashboard.pp...
install.sh: Applying ./resources/assets/manifests/60-dfe-instance.pp...
install.sh: Applying ./resources/assets/manifests/70-nginx_php-fpm.pp...
install.sh: Complete! Output spooled to /tmp/dfe-installer.log
ubuntu@ip-10-10-2-233:~/dfe-installer$
```
All output of the installation utility is directed to a log file located at `/tmp/dfe-installer.log`. If there is an error, the log will detail the issue.
This log file is rotated each time `install.sh` is executed. The prior file is renamed to `/tmp/dfe-installer.log.` and a new empty file is created.
## Post-Installation Steps
If you have already configured your DNS to point to the new installation, then you can skip this part entirely.
If you're setting up DFE on a single system, or with test/faux DNS entries, you *must* add these entries to your own `/etc/hosts` file.
First, you must locate the public, or accessible, IP address of the system upon which DFE is installed. Once you have that, simply add a line to the end of your `/etc/hosts` file:
```
public.ip.address.here console.zone.domain.com dashboard.zone.domain.com zone.domain.com test1.zone.domain.com test2.zone.domain.com
```
Replacing **zone**, **domain** with the zone and domain used when installing the system. The final two entries are to map instances you create to your faux DNS. They allow you to create two instances (test1 and test2). You can change the name to whatever you prefer or add more entries. It's up to you.
Here's an actual example:
```
57.15.77.166 console.dfe.3wipes.com dashboard.dfe.3wipes.com dfe.3wipes.com leela.dfe.3wipes.com bender.dfe.3wipes.com fry.dfe.3wipes.com
```
The order of the hosts in the list is not important. However, the fact that they are separated by spaces, is.
Retrieved from "[https://wiki.dreamfactory.com/index.php?title=DFE/Installation&oldid=33346](https://wiki.dreamfactory.com/index.php?title=DFE/Installation&oldid=33346)"