Setting up guest access
This tutorial explains how to set up access to specific API endpoints for unauthenticated users and users without login accounts, also known as "guest access".
Contents
Background
You may provide access to specific API services and resources based on the provisioned API key alone, without requiring authentication or session instantiation. The permissions granted to these users are based solely on the API key they provide and the access granted by the default role of that API key. Calls to the API using this API key will be treated as "guest" calls as long as no session token is provided along with the call, so both non-existent users and not-logged-in users are treated the same with respect to access control.
Set Up Guest Access
Set Up via Admin Console
1. Create a role with the desired access.
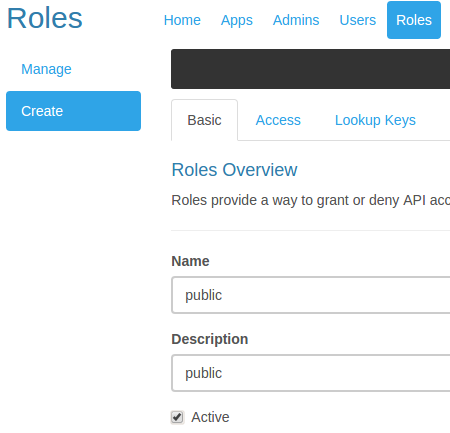
- Navigate to 'Roles' > 'Create', enter 'Name' and 'Description' values, and check the box labeled 'Active'.
-
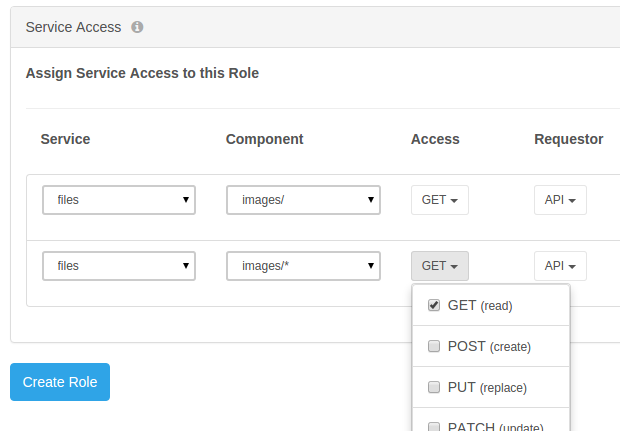
- Navigate to the 'Access' tab of the role being created and add access rule(s) as desired. In this example, we will allow GET access to all contents of the local storage folder called
images.
- Navigate to the 'Access' tab of the role being created and add access rule(s) as desired. In this example, we will allow GET access to all contents of the local storage folder called
- Note the two access components granted:
images/permits the role to list the contents of the folder by callingapi/v2/images/andimages/*permits access to all contents of the folder.
- Note the two access components granted:
- Click 'Create Role' and observe a green pop-up message informing you "Role saved successfully".
2. Create an API key for guest usage.
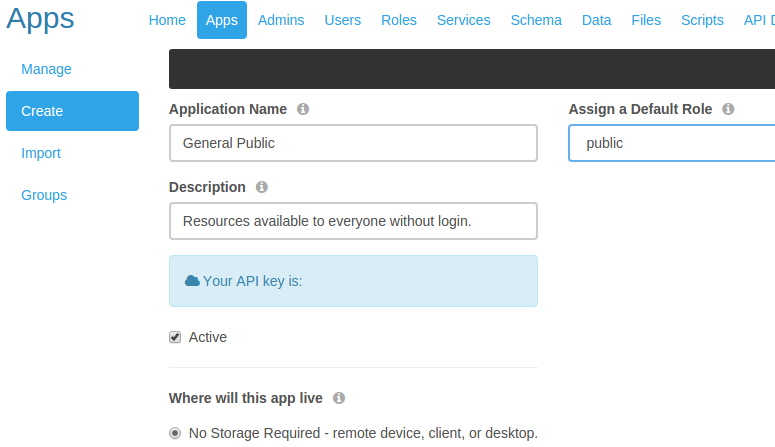
- Navigate to 'Apps' > 'Create', enter 'Application Name' and 'Description' values, select the role you created in step #1 under 'Assign a Default Role', and check the box labeled 'Active'.
-
- Click 'Create Application' and observe a green pop-up message informing you "{Application Name} saved successfully."
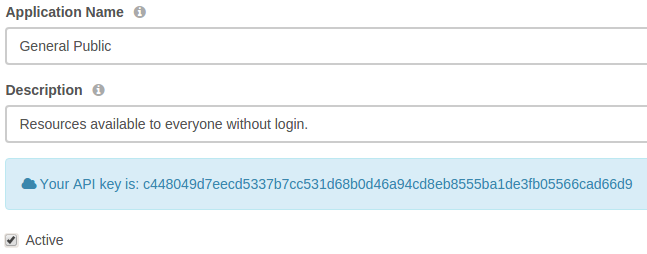
- Navigate back to 'Apps' > 'Manage', click on the row of the app you just created, and make note of the API key that has been generated for you.
3. Create a CORS entry.
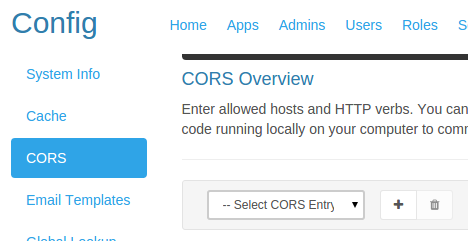
- To allow truly anyone to retrieve this resource, CORS must permit all domains to access this REST path. Navigate to 'Config' > 'CORS' and click [ + ] to create a new CORS Entry.
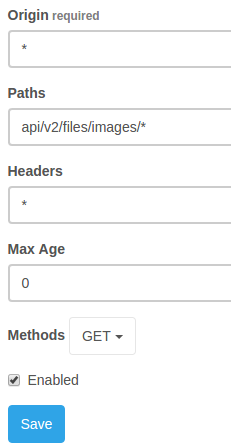
- During development and testing, a CORS entry with Origin=*, Paths=*, Headers=*, Max Age=0, and all Methods permitted is the easiest to work with. When moving into production, security can be further restricted. For this example, we only need to provide GET Method access to api/v2/files/images/*. So enter Origin=*, Paths=api/v2/files/images/*, Headers=*, Max Age=0, select the GET Method, and check the box labeled 'Enabled'.
- Click 'Save' and observe a green pop-up message informing you "CORS entry created successfully."
4. Test.
Set Up by API
The below API calls will be made from cURL for the sake of raw simplicity.
1. Instantiate an admin session.
- Since the below changes are made to system resources, an Admin user session must be used to make these API calls. (Refer to the Logging In and Access Using JWT tutorials for details.)
<source lang="bash"> $ curl -X POST api/v2/system/admin/session \ -d '{"email":"[email protected]","password":"password"}'
{
 "session_token":"eyJ0eCblwx",
 "session_id":"eyJ0eXUpa1",
 "id":4,
 "name":"Admin Name",
 "first_name":"Admin",
 "last_name":"Name",
 "email":"[email protected]",
 "is_sys_admin":true,
 "last_login_date":"2015-11-02 20:26:58",
 "host":"console"
}
</source>
- For the remainder of this tutorial, the
session_tokenreceived in response to the above call will be passed with every API call as HTTP headerX-DreamFactory-Session-Token.
- For the remainder of this tutorial, the
2. Create a role with the desired access.
- Construct a JSON definition of the desired role configuration. In this case, the
filesservice is known to have"service_id":7,"verb_mask":1is known to be GET, and"requestor_mask":1is known to be API.
- Construct a JSON definition of the desired role configuration. In this case, the
<source lang="javascript"> {
 "resource":
   [
     {
       "name":"public",
       "description":"public",
       "is_active":true,
       "role_service_access_by_role_id":
         [
           {
             "verb_mask":1,
             "requestor_mask":1,
             "component":"images/",
             "service_id":7
           },
           {
             "verb_mask":1,
             "requestor_mask":1,
             "component":"images/*",
             "service_id":7
           }
         ]
     }
   ]
}
</source>
- POST this JSON to
api/v2/system/roleand receive back the id of the created role.
- POST this JSON to
<source lang="bash"> $ curl -X POST api/v2/system/role \ -H 'X-DreamFactory-Session-Token: eyJ0eCblwx' \ -d '{ "resource": [ { "name":"public", "description":"public", "is_active":true, "role_service_access_by_role_id": [ { "verb_mask":1, "requestor_mask":1, "component":"images/", "service_id":3 }, { "verb_mask":1, "requestor_mask":1, "component":"images/*", "service_id":3 } ] } ] }'
{"resource":[{"id":42}]}
</source>
- This indicates you've successfully created the role, and DreamFactory has assigned it an
idof42.
- This indicates you've successfully created the role, and DreamFactory has assigned it an
3. Create an API key for guest usage.
- Construct a JSON definition of the desired app configuration. Note that the default
role_idshould be set to the id of the role created in step #2, and"type":0corresponds to the app type labeled in the GUI as "No Storage Required - remote device, client, or desktop."
- Construct a JSON definition of the desired app configuration. Note that the default
<source lang="javascript"> {
 "resource":
   [
     {
       "name":"General Public",
       "description":"Resources available to everyone without login.",
       "type":0,
       "role_id":42,
       "is_active":true
     }
   ]
}
</source>
- POST this JSON to
api/v2/system/appand receive back the id of the created role. To avoid making an additional call to retrieve the created API key, specify additional fields to return by appending?fields=*(which will return all fields defined for the created app) or?fields=id%2Capi_key(which will returnidandapi_keyonly) to the POST call.
- POST this JSON to
<source lang="bash"> $ curl -X POST api/v2/system/app?fields=id%2Capi_key \ -H 'X-DreamFactory-Session-Token: eyJ0eCblwx' \ -d '{ "resource": [ { "name":"General Public", "description":"Resources available to everyone without login.", "type":0, "role_id":42, "is_active":true } ] }'
{"resource":[{"id":13,"api_key":c448049d7eecd5337b7cc531d68b0d46a94cd8eb8555ba1de3fb05566cad66d9}]}
</source>
- This indicates you've successfully created the app, and DreamFactory has assigned it an
idof42and anapi_keyofc448049d7eecd5337b7cc531d68b0d46a94cd8eb8555ba1de3fb05566cad66d9.
- This indicates you've successfully created the app, and DreamFactory has assigned it an
4. Create a CORS entry.
- To allow truly anyone to retrieve this resource, CORS must permit all domains to access this REST path. During development and testing, a wide-open CORS entry is the easiest to work with. When moving into production, security can be further restricted. For this example, we only need to provide GET Method access to
api/v2/files/images/*, so we may construct a JSON definition for the desired CORS entry as follows:
- To allow truly anyone to retrieve this resource, CORS must permit all domains to access this REST path. During development and testing, a wide-open CORS entry is the easiest to work with. When moving into production, security can be further restricted. For this example, we only need to provide GET Method access to
{
  "resource":
    [
      {
        "origin":"*",
        "path":"api/v2/files/images/*",
        "method":["GET"],
        "enabled":true,
        "header":"*",
        "max_age":0
      }
    ]
}
- POST this JSON to
api/v2/system/corsand receive back the id of the created CORS entry.
- POST this JSON to
$ curl -X POST api/v2/system/cors \
-H 'X-DreamFactory-Session-Token: eyJ0eCblwx' \
-d '{ "resource": [ { "origin":"*", "path":"api/v2/files/images", "method":["GET"], "enabled":true, "header":"*", "max_age":0 } ] }'

{"resource":[{"id":5}]}
- This indicates you've successfully created the CORS entry, and DreamFactory has assigned it an
idof5.
- This indicates you've successfully created the CORS entry, and DreamFactory has assigned it an
5. Test.
Testing
- Note: To allow cross-domain access (for example, while testing an app locally with a DreamFactory instance hosted elsewhere), you will need to configure a CORS Entry.
- During development and testing, a CORS entry with Origin=*, Paths=*, Headers=*, Max Age=0, and all Methods permitted is the easiest to work with.
To test from the REST API client or app of your choice, simply make an unauthenticated API call to the resource(s) you've made available using the API key you've created.
Using a browser
Since all browsers perform a GET by default, navigate to api/v2/files/images/?api_key=c448049d7eecd5337b7cc531d68b0d46a94cd8eb8555ba1de3fb05566cad66d9 to list the contents of the images folder:
<source lang="javascript">{ "resource":
 [
  { "path":"images/awesome.gif",
    "content_type":"image/gif",
    "last_modified":"Thu, 05 Nov 2015 15:44:11 GMT",
    "content_length":25947,
    "name":"awesome.gif",
    "type":"file" },
  { "path":"images/howrude.jpg",
    "content_type":"image/jpeg",
    "last_modified":"Thu, 05 Nov 2015 16:11:08 GMT",
    "content_length":17436,
    "name":"howrude.jpg",
    "type":"file" }
 ]
}</source>
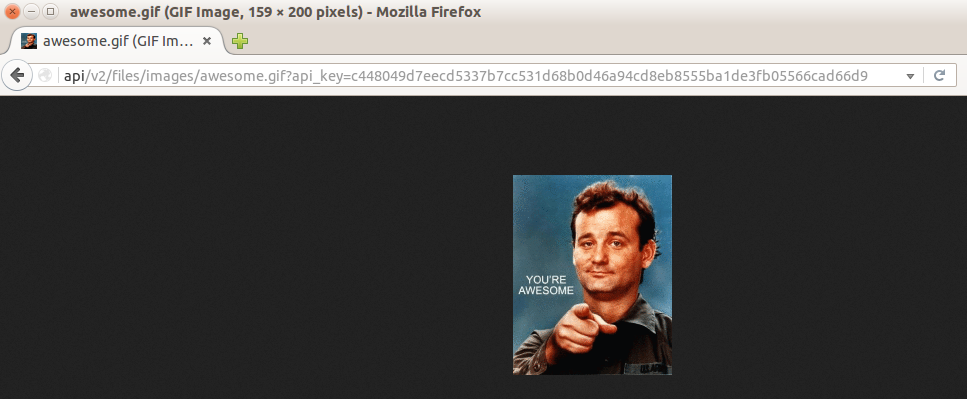
Now that you know the two files that exist in the folder, you can retrieve awesome.gif by navigating to api/v2/files/images/awesome.gif?api_key=c448049d7eecd5337b7cc531d68b0d46a94cd8eb8555ba1de3fb05566cad66d9
Since we did not permit access to list all resources under api/v2/files/, if you navigate to api/v2/files/?api_key=c448049d7eecd5337b7cc531d68b0d46a94cd8eb8555ba1de3fb05566cad66d9 you will be denied access:
Using cURL
To list the contents of the images folder from cURL:
<source lang="bash">
$ curl -X GET api/v2/files/images/ \
-H 'X-DreamFactory-Api-Key: c448049d7eecd5337b7cc531d68b0d46a94cd8eb8555ba1de3fb05566cad66d9'
{"resource":[{"path":"images/awesome.gif","content_type":"image/gif","last_modified":"Thu, 05 Nov 2015 15:44:11 GMT","content_length":25947,"name":"awesome.gif","type":"file"},{"path":"images/howrude.jpg","content_type":"image/jpeg","last_modified":"Thu, 05 Nov 2015 16:11:08 GMT","content_length":17436,"name":"howrude.jpg","type":"file"}]}
</source>
And then to download awesome.gif to the current folder:
<source lang="bash">
$ curl -O -X GET api/v2/files/images/awesome.gif \
-H 'X-DreamFactory-Api-Key: c448049d7eecd5337b7cc531d68b0d46a94cd8eb8555ba1de3fb05566cad66d9'
 % Total    % Received % Xferd  Average Speed   Time    Time     Time  Current
                                Dload  Upload   Total   Spent    Left  Speed
100 25947 100 25947 0 0 193k 0 --:--:-- --:--:-- --:--:-- 193k
$ ls -l | grep awesome
-rw-rw-r-- 1 user user 25947 Nov 5 14:22 awesome.gif
</source>
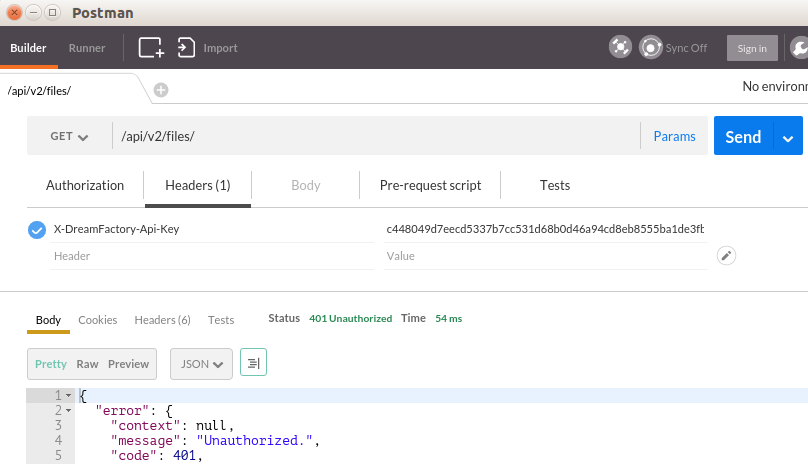
Since we did not permit access to list all resources under api/v2/files/, attempting to list all the contents of the files/ directory will fail:
<source lang="bash">
$ curl -X GET api/v2/files/ \
-H 'X-DreamFactory-Api-Key: c448049d7eecd5337b7cc531d68b0d46a94cd8eb8555ba1de3fb05566cad66d9'
{"error":{"context":null,"message":"Unauthorized.","code":401}}
</source>
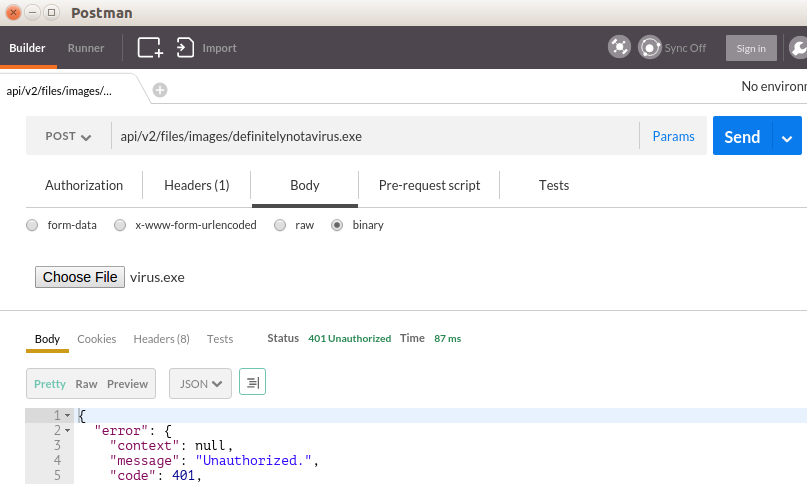
Since we only allowed unauthenticated GET requests, attempting to upload a file via POST will fail also: <source lang="bash"> $ curl -X POST -T virus.exe \ api/v2/files/images/definitelynotavirus.exe \ -H 'X-DreamFactory-Api-Key: c448049d7eecd5337b7cc531d68b0d46a94cd8eb8555ba1de3fb05566cad66d9'
{"error":{"context":null,"message":"Unauthorized.","code":401}}
</source>
Using a REST client
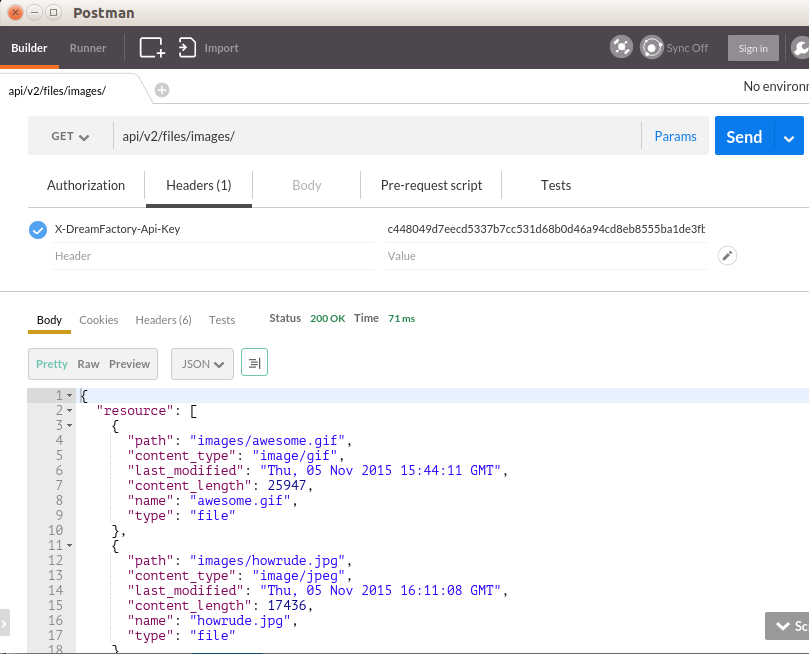
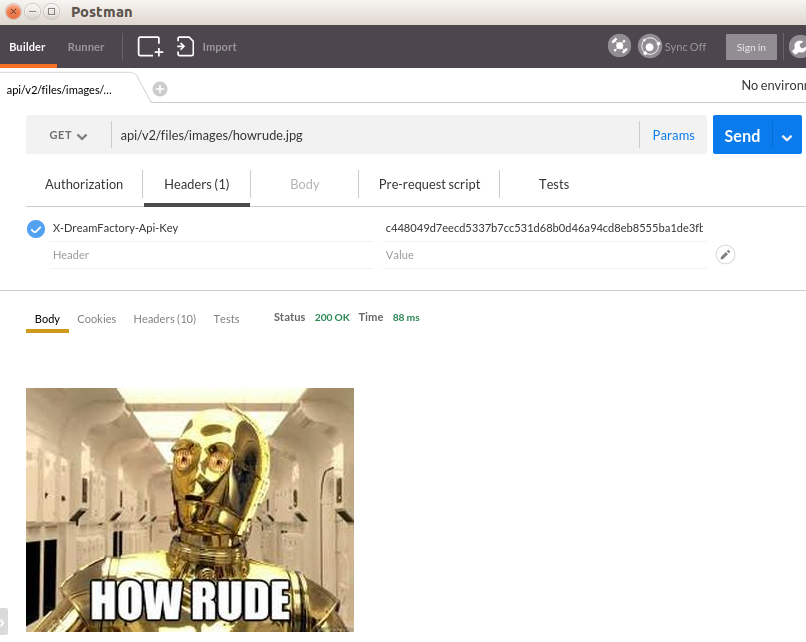
From a REST client such as the POSTman extension for Google Chrome, to list the contents of the images folder:
- And then to retrieve
howrude.jpg:
- And then to retrieve
Since we did not permit access to list all resources under api/v2/files/, attempting to list all the contents of the files/ directory will fail:
Since we only allowed unauthenticated GET requests, attempting to upload a file via POST will fail also:
